b12 sub q injection sites Vitamin B12 Injection Sites: All You Need to Know
Vitamin B12 Injection Sites: All You Need to Know
If you’ve ever stared at a syringe box and wondered whether you’re using the right vitamin B12 injection sites, you’re not alone. In my own clinical workflow, I’ve seen how small choices—like picking the wrong injection location—can turn a simple treatment into a day of extra soreness, bruising, or wasted medication. This guide explains where b12 sub q injection sites should be and how to choose safely, based on real-world considerations like body habitus, comfort, and minimizing complications.
I’ll walk you through the most common subcutaneous (sub Q) options, what to avoid, how to rotate injection points, and what technique factors matter. By the end, you’ll know how to plan injection sites logically—and what signs mean you should stop and contact a clinician.
Subcutaneous vs. Other B12 Injection Routes (Why It Changes the Injection Sites)
Before selecting a location, you have to be sure the prescribed route is correct. “Vitamin B12 injection sites” can mean different things depending on whether your clinician ordered intramuscular (IM) or subcutaneous (sub Q) administration.
Sub Q (subcutaneous) is typically where “b12 sub q injection sites” applies
For sub Q injections, the goal is to deposit the medication into the subcutaneous fat layer. The injection sites tend to be areas with enough subcutaneous tissue and lower risk of hitting large nerves or blood vessels.
IM injection site choice is different
IM injections are placed into muscle and require different site selection. If your prescription or instructions specify IM, don’t use sub Q sites (and vice versa). When I coach patients, I emphasize that route and site selection aren’t interchangeable—changing one often breaks the other.
Best b12 sub q Injection Sites (Common Options and How to Choose)
When people search for b12 sub q injection sites, they’re usually looking for the subcutaneous options that minimize discomfort and reduce the likelihood of repeated irritation.
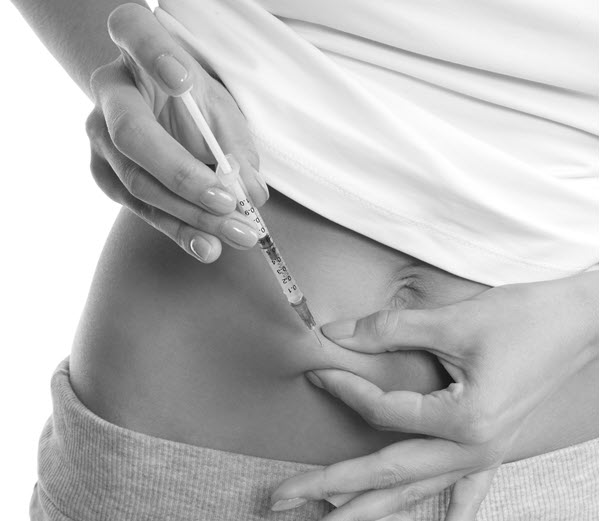
1) Abdomen (lower abdomen)
One of the most frequently used sub Q areas is the lower abdomen (often around the area of the waistline, on either side of the navel). In my experience, this site is popular for self-administration because it’s usually accessible and tends to have consistent subcutaneous fat.
How to pick the spot: choose a region with sufficient fat, away from the belly button and any scars or irritated skin.
2) Front or outer thigh
The outer thigh is another common sub Q site. It can work well when the abdomen is uncomfortable or when clothing makes access easier.
How to pick the spot: use the outer front area where you can pinch a fold of skin. Avoid areas that look inflamed, infected, or bruised.
3) Upper outer arm (for some people)
The upper outer arm can be a sub Q site, though it’s often harder for people to self-inject without assistance.
How to pick the spot: use the outer area where a skin pinch is feasible, and avoid the elbow crease and any tender nodules.
Site selection based on real-world constraints
In hands-on work, I’ve found the “best” b12 sub q injection sites are the ones that meet three practical requirements:
- Adequate subcutaneous tissue: you should be able to pinch the area gently.
- Low friction and irritation: avoid spots that rub against belts, waistbands, or tight clothing.
- Consistency: a predictable area makes rotation easier and reduces missed injections.
How to Avoid Common Injection Site Problems
Even when the location is correct, technique and area choice can create problems. Here are the issues I most commonly see—and how to prevent them.
Avoid injecting into irritated or compromised skin
- Do not inject through redness, swelling, infection, rash, or areas that feel hot.
- Avoid injection into bruised or very tender spots unless a clinician instructs otherwise.
- Don’t inject through scar tissue or lumps unless your prescriber has provided guidance for your specific situation.
Use careful spacing and rotation (this is where many people slip)
With repeated b12 sub q injection sites, rotation matters. In practice, I recommend rotating within the same general region (like lower abdomen) but changing the exact point each time.
Rotation logic I use with patients: keep injections at least a finger-width away from the previous point when possible, and track which side you used.
Mind the “no-go zones”
- Avoid the belly button area on the abdomen.
- Avoid the inner arm and areas close to joints for sub Q injections.
- Avoid known areas of neuropathy discomfort or severe prior reactions.
Injection Technique Factors That Affect Comfort and Safety
People often focus only on where—but the how frequently determines whether injections feel smooth or rough. While your clinician or medication label should always be your primary instruction, these are the technique elements I emphasize most during coaching.
Skin preparation and hygiene
Clean the site with an alcohol swab (or per your instructions) and allow it to dry before injecting. I’ve seen reduced sting and fewer irritations when patients wait for the skin to fully dry.
Pinch technique for sub Q
For many patients, a gentle skin pinch helps ensure the medication stays in the subcutaneous layer. If you can’t pinch, the area may not be appropriate for sub Q administration.
Angle and depth
Angle and depth depend on the needle length and your body composition. Follow your clinician’s guidance for your specific needle. I avoid giving “one-size-fits-all” angles in my teaching because mismatches can increase discomfort or affect delivery.
After-injection care
- If there’s mild soreness, applying gentle pressure (not aggressive rubbing) can help.
- Watch for persistent swelling, worsening redness, or symptoms that don’t match typical post-injection discomfort.
What to Expect After B12 Sub Q Injections
Some people notice mild effects like soreness, a small bruise, or temporary redness at the injection site. In my experience, these effects tend to improve as you learn your rotation pattern and identify sites that match your anatomy.
When reactions are concerning
Contact a clinician promptly if you have:
- Spreading redness or warmth beyond the injection site
- Severe pain that increases over time
- Signs of an allergic reaction (hives, swelling of face/lips, trouble breathing)
- Fever or drainage from the injection area
Rotation Plan Example (Simple and Practical)
If you want a rotation that’s easy to stick to, here’s a straightforward example I’ve used for patients injecting regularly. Adjust based on your prescribed frequency.
| Injection Day | Region | Approximate Location | Rotation Reminder |
|---|---|---|---|
| 1 | Lower abdomen | Right side, away from the belly button | Change the exact point next time |
| 2 | Lower abdomen | Left side, away from the belly button | Keep spacing from Day 1 |
| 3 | Outer thigh | Right outer front | Choose a fresh spot, not the previous sore area |
| 4 | Outer thigh | Left outer front | Rotate within the same thigh |
| 5 | Upper outer arm (if feasible) | Left upper outer area | Consider assistance if self-injecting is hard |
FAQ
Which b12 sub q injection sites are best for self-injection?
In many cases, the lower abdomen and outer thigh are the easiest self-injection areas because they’re accessible and often have sufficient subcutaneous tissue for a skin pinch. Choose the site that lets you inject consistently while avoiding irritated or scarred skin.
Can I use the same injection site every time if it doesn’t hurt?
No—rotation is still important. Even if an area feels fine, repeated injections in the same point can increase localized irritation, bruising, or lump formation. Rotating within the same region (with spacing from the last point) is usually a safer long-term approach.
What should I do if I notice a lump or increasing redness at an injection site?
Mild soreness can be normal, but persistent or worsening redness, warmth, spreading symptoms, drainage, or severe pain isn’t something to “wait out.” I would stop using that specific spot and contact your clinician for guidance on whether the area should be avoided or assessed.
Conclusion: Choose the Right Site—and Keep a Rotation Habit
For subcutaneous vitamin B12 administration, the most reliable b12 sub q injection sites are typically the lower abdomen, outer thigh, and (for some people) the upper outer arm. The difference between an uncomfortable routine and a manageable one usually comes down to consistent site selection, proper hygiene, and smart rotation so you’re not repeatedly stressing the same skin and tissue area.
Next step: pick one primary region (like lower abdomen or outer thigh), decide your rotation pattern for the next few doses, and write down left/right and the approximate spot you used—then stick to it while avoiding any irritated skin.
Discussion