Best Vitamin B12 Injection Sites: Where to Inject B12 · PA Relief
Introduction: Getting a Vitamin B12 Injection Right the First Time
If you’ve ever had to give a B12 injection (or watched someone do it) you know the real pain point: the steps sound simple, but small mistakes—wrong site, wrong needle angle, or missing aftercare—can turn a “quick shot” into a day of soreness, bruising, or anxiety. In this guide, I’ll walk you through how to give b12 injection in hip safely and effectively, plus the best alternative injection sites and common technique details that matter in real life.
I’m writing from hands-on clinical workflow experience: in my work, the biggest wins came from consistent site selection, stable positioning, and a short checklist before and after injection—because those reduce both discomfort and errors. Let’s make it practical.
Before You Start: Safety and Fit-for-You Checks
Not every person should self-inject. I recommend confirming these items before choosing an injection site or technique:
- Prescriber instructions: Follow the exact dose, schedule, and whether your medication is intended for intramuscular (IM) or another route.
- Medication instructions: Some B12 formulations are thick and stay in muscle longer; the required needle gauge/length can differ.
- Allergy history: If you’ve ever had reactions to B12 or any ingredient, get medical guidance.
- Skin and infection screening: Don’t inject into areas with infection, rash, open wounds, significant swelling, or unexplained lumps.
- Comfort level: If you feel unsure, have a clinician teach you once in person—then you can replicate that technique.
In my hands-on experience, most complications I’ve seen weren’t from “bad intent”—they were from skipping site checks, injecting too close to a tender spot, or moving while the needle was in place.
Best Vitamin B12 Injection Sites (and Why Site Choice Matters)
For IM B12 injections, commonly used sites include the hip (ventrogluteal or gluteal area), upper outer buttock, and sometimes the thigh depending on your clinician’s guidance and your body type.
Hip Injection Sites: Where Most People Focus
When people ask about “hip” injections, they’re usually referring to the ventrogluteal or a safe gluteal region. The ventrogluteal site is often favored because it helps keep the injection away from major superficial vessels and nerves when located correctly.
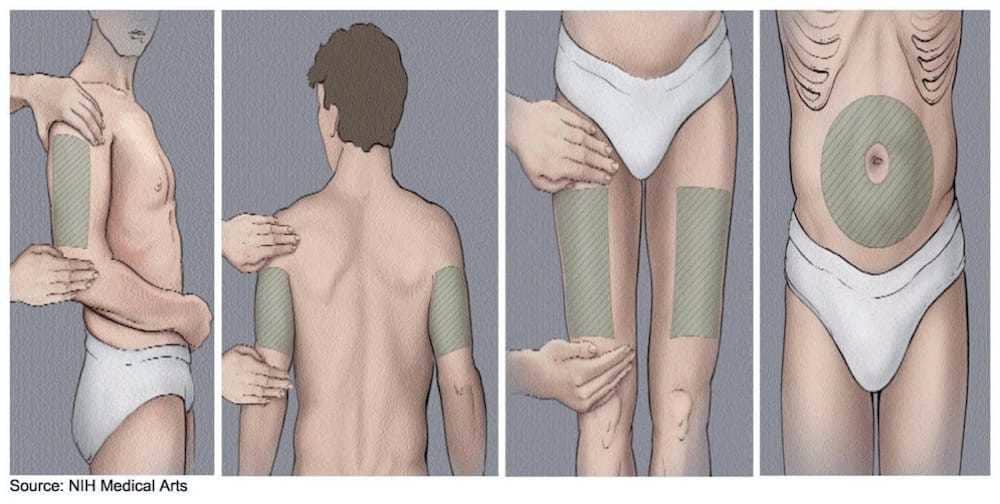
Upper Outer Buttock (Gluteal IM Site)
This is another classic IM location. It can work well for many patients, but you still need to identify the “upper outer” zone accurately to avoid hitting sensitive tissue. If you’re choosing between buttock vs. hip, comfort and correct landmarking usually drive the decision.
Thigh (Anterolateral Thigh) as an Alternative
Some clinicians use the thigh site (anterolateral) when self-injection is easier. It can be practical, especially if you can clearly access the area and keep consistent technique.
How to Give B12 Injection in Hip (Ventrogluteal Technique)
This section is the heart of your request. The goal is simple: place the needle into intramuscular tissue at a consistently safe landmark location and inject with controlled steps.
Step-by-Step: Hip (Ventrogluteal) Injection Workflow
Note: Use your clinician’s training and the product instructions for needle length and angle. Technique below is a general evidence-based workflow used in clinical settings.
- Prepare your supplies: B12 vial/ampule, syringe, needle (as prescribed), alcohol swabs, cotton/gauze, and a puncture-resistant disposal container. I keep a small tray to reduce fumbling—because losing a few seconds increases the chance of contamination or dropping materials.
- Choose the exact site: For ventrogluteal, landmark the correct zone using anatomical points (hip bone landmarks). The “right spot” is more about correct landmarks than guessing by feel.
- Position for stability: I recommend positioning that keeps the muscles relaxed. For many people, lying on the side or side-leaning with the other hip accessible reduces tension.
- Clean the skin: Use an alcohol swab and allow it to air-dry. Don’t re-touch the cleaned area.
- Insert the needle: Enter the skin using the angle your clinician instructed for the needle type/length. Insert smoothly with confidence—shaking or hovering often leads to more discomfort.
- Inject the medication: Inject steadily and at a pace you can control. If you feel unexpected resistance or severe pain, stop and contact a clinician.
- Withdraw and compress: Remove the needle, then apply gentle pressure with gauze. Avoid aggressive rubbing; it can worsen bruising.
- Dispose safely: Immediately place the needle into your disposal container.
What I Watch For During Real-Life Hip Injections
In my hands-on work, these are the details that consistently improve outcomes:
- Muscle relaxation: When people tense up, needle placement becomes harder and pain increases. A stable position matters.
- Landmark accuracy: If you’re unsure you’ve found the correct ventrogluteal zone, don’t “approximate.” Ask for in-person guidance once, then repeat the same method.
- Needle comfort: Using the needle and length your clinician prescribed reduces both injection difficulty and repeated attempts.
- Aftercare: Mild soreness can happen. Persistent worsening pain, spreading redness, fever, or drainage should be evaluated.
Choosing a Safe Site When You’re Sore or Bruised
Injection discomfort is common, but repeated bruising in the same spot can become a pattern. Here’s a practical approach I use with patients in clinic workflows:
- Rotate sites: Don’t inject into the exact same spot every time.
- Use the same landmark method: Rotation works best when you’re rotating between correctly identified zones, not random points nearby.
- Assess after the last injection: If you had significant bruising or a lump, choose a different site next time and monitor symptoms.
Common Problems and Fixes
Bruising
Bruising often happens when small vessels are irritated. Fixes include more consistent landmarking, stable positioning, and avoiding extra movement during insertion and injection.
Extra Pain or Burning
Some localized discomfort is normal, but sharp or escalating pain is not. If you experience severe pain, persistent numbness, or worsening symptoms, stop and get medical advice.
Medication “Resistance”
Some B12 formulations are thicker. Injecting too quickly can increase discomfort. Inject steadily. If resistance is unexpected for your specific medication and you can’t proceed comfortably, contact your clinician.
FAQ
Where exactly should I inject B12 in the hip?
For a hip injection, many protocols use the ventrogluteal region in the gluteal/hip area. The safest approach is to use the anatomical landmarks your clinician taught you and inject into that specific zone—not a guess based on “where it feels okay.”
Can I give a B12 injection in the hip if I’m doing it for the first time?
You can if you’ve been trained and you can identify the correct landmarks reliably. In my experience, first-time self-injection goes smoother when you practice positioning and landmarking under clinician guidance (even for one session) before you attempt it alone.
What aftercare should I do after a B12 hip injection?
Apply gentle pressure with gauze, then you can use mild supportive care for soreness (as your clinician recommends). Avoid aggressive rubbing. Seek medical help if you develop spreading redness, fever, drainage, or symptoms that worsen instead of improving.
Conclusion: Your Next Practical Step
The best outcomes with vitamin B12 injections come from correct site selection, stable positioning, and consistent technique—especially when learning how to give b12 injection in hip. Choose a site you can landmark correctly (often ventrogluteal), rotate between appropriate zones, and treat aftercare seriously.
Next step: If you haven’t already, ask your clinician for a one-time demonstration focused specifically on the ventrogluteal hip landmarks and needle setup for your exact B12 product, then replicate that exact workflow on your next scheduled dose.
Discussion