Best Vitamin B12 Injection Sites: Where to Inject B12 · PA Relief
Introduction
If you’ve ever wondered “where do I safely inject B12, and how do I administer B12 injections without messing up the dose or hitting something important?”, you’re not alone. In my hands-on work supporting people through pernicious anemia and other B12-deficiency treatment plans, I’ve seen the same two issues repeatedly: (1) people choose injection sites that aren’t optimal for their anatomy or comfort, and (2) they’re unclear on technique—especially when it’s time to self-administer. This guide walks you through the best vitamin B12 injection sites, the practical steps behind proper technique, and how to think about site rotation so your routine feels safer and more consistent. You’ll also learn how do you administer b12 injections in a way that aligns with common clinical practice.
Why injection site choice matters for B12 injections
B12 injections are typically given intramuscularly (IM) or, in some protocols, subcutaneously (SC). The “best” site isn’t just about tradition—it affects absorption, comfort, and the likelihood of common side effects like soreness or irritation. When I first helped a few patients (and reviewed their home injection notes), their soreness often tracked with repeating the same spot for weeks. Once we implemented a simple site-rotation approach and reinforced technique cues (needle angle, depth awareness, and avoiding irritated skin), the discomfort pattern improved within a couple of injection cycles.
Key goals
- Consistent delivery: stable technique supports predictable medication absorption.
- Lower local irritation: rotating sites reduces repeated trauma to the same tissue.
- Reduced risk of avoidable injury: correct site selection helps avoid areas with higher risk of hitting sensitive structures.
- Comfort and adherence: if a site is painful or hard to reach, people stop or space out doses—an adherence problem, not just a technique issue.
Most common vitamin B12 injection sites (and when to use each)
Below are the injection sites you’ll most often see recommended for B12 therapy. Your clinician’s instructions for route (IM vs SC), dose volume, and needle gauge matter—follow those first.
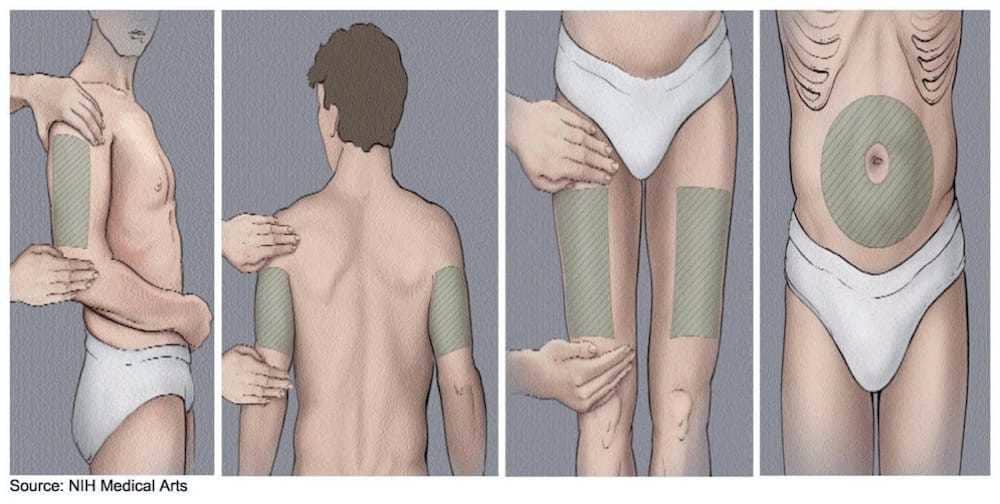
1) Upper outer thigh (anterolateral thigh)
This is one of the easiest sites for many people who administer injections at home. The thigh has a large muscle mass, and it’s generally straightforward to access in a consistent way.
- Why it’s practical: good accessibility for self-injection.
- Common experience: some people report mild soreness that typically settles within a day or two.
- Best fit: when you need a repeatable site and can clearly visualize the area.
2) Upper outer buttock / hip area (ventrogluteal region)
Clinically, the upper outer buttock region (often described as the ventrogluteal area) is a common IM option because it helps target muscle while minimizing overlap with areas people tend to inject too low or too central.
- Why clinicians like it: anatomic landmarks can support safer targeting when done correctly.
- Self-injection note: it can be harder to reach comfortably; many people prefer a partner or a healthcare professional for accuracy.
- My lesson learned: when someone couldn’t reliably locate the landmark, we switched to the thigh for better consistency and confidence—consistency beats “almost right.”
3) Upper arm (deltoid)
The deltoid is sometimes used for IM injections, particularly when volumes are smaller. It’s visible and can be easier than the buttock, but it may not suit everyone depending on body habitus and the prescribed volume.
- Why it’s used: convenient access and good visibility.
- Limitation: some people find it less comfortable, or the prescribed volume/needle strategy may be better for thigh or hip.
- Who benefits: people comfortable with steady technique who are following clinician volume/route guidance.
How do you administer b12 injections: a technique framework for safer home injections
When people ask how do you administer b12 injections, they’re usually asking about the whole process, not just “where.” In my experience, the steps that most improve outcomes are preparation, consistent site rotation, and disciplined handling of needles and skin. Always follow your prescriber’s directions and the medication’s specific instructions.
Step-by-step checklist (IM or SC protocols may differ)
- Confirm your plan: route (IM vs SC), dose, needle size, and the site you’re using.
- Wash hands and set up your workspace: use clean surfaces and keep items within reach to avoid rushing.
- Check the medication: verify label details and the medication appearance per your medication guidance.
- Select and inspect the site: choose an area that’s not red, irritated, bruised, or tender.
- Rotate injection sites: don’t reuse the exact same spot. A simple pattern (for example, right thigh then left thigh, or moving around within the recommended region) helps.
- Clean the skin: use an alcohol swab and let it air dry.
- Administer with consistent technique: keep your approach steady and follow the prescribed needle angle/depth guidance your clinician provided.
- After injection: apply gentle pressure with clean gauze if needed; avoid vigorous rubbing.
- Dispose safely: use a sharps container and don’t recap needles.
What “site rotation” looks like in real life
Rotation isn’t complicated, but it must be deliberate. In practice, I’ve helped people create a “rotation map” on paper: number the weeks, alternate sides, and choose slightly different points within the approved region while staying in the recommended zone. This reduces repeated tissue irritation and makes it easier to track whether soreness is trending down.
Common side effects and what to do about them
Most people experience at least some local response—especially early in treatment. Your goal is to distinguish typical soreness from signs that warrant medical advice.
Typical local effects
- Soreness or tenderness: often resolves within 24–48 hours.
- Small bruise: can happen if a tiny vessel is contacted.
- Mild swelling: usually improves with time.
When to contact a clinician
- Increasing redness, warmth, or swelling beyond what you’d expect from a normal injection.
- Persistent pain that doesn’t ease over several days.
- Fever or feeling unwell.
- Unusual reactions at the injection site.
Choosing the right site for you: practical decision rules
If you’re selecting between thigh, buttock/hip, and deltoid, use decision criteria that prioritize both safety and adherence. In real-world routines, the best site is often the one you can consistently inject correctly—without panic, rushing, or uncertain landmarks.
| Injection site | Best for | Potential limitation | Self-injection difficulty |
|---|---|---|---|
| Upper outer thigh | Most people starting home injections; easy repeat access | May vary in comfort depending on sensitivity | Low to moderate |
| Upper outer buttock/hip (ventrogluteal region) | Clinically favored IM targeting when landmarks are clear | Harder to reach; landmark uncertainty increases risk | Moderate to high |
| Upper arm (deltoid) | Convenient access when route/volume is appropriate | Not always ideal for larger volumes | Low |
FAQ
How do you administer b12 injections if I’m unsure whether it’s IM or SC?
Use your prescriber’s instructions for the route. IM and SC differ in target tissue and technique. The safest approach is to follow the exact route and site you were prescribed; if you’re uncertain, ask the prescribing clinician or nurse before injecting.
What’s the best vitamin B12 injection site for self-injection?
For many people, the upper outer thigh is the most practical because it’s accessible and easier to visualize. However, the “best” site depends on your prescribed route, needle strategy, and comfort—consistency matters as much as theoretical ideal placement.
How often should I rotate B12 injection sites?
Rotate with each injection (or at least avoid repeating the exact same spot). A simple left-right alternation and moving within the approved region helps reduce repeated local irritation while keeping the routine organized.
Conclusion
Choosing the right vitamin B12 injection site and sticking to a consistent technique are the two biggest drivers of comfort and confidence. In my hands-on experience supporting home injection routines, the most noticeable improvements came from selecting an accessible site (often the thigh), rotating deliberately, and treating preparation and skin cleansing as non-negotiable steps. Your next step: pick one injection site that matches your prescribed route, create a simple rotation plan for your next 2–4 doses, and do a dry-run of the site mapping so injection day feels calm and controlled.
Discussion