How to Give B12 Injections at Home to Yourself · PA Relief
Introduction
If you’ve ever been told you need vitamin B12 shot injection site injections but you dread the needle—or worry you’ll inject it in the wrong place—this guide is for you. In my hands-on work with medication routines (both for myself and for family members), the biggest pain point wasn’t the pain of the injection; it was uncertainty: where exactly to inject, what “correct” feels like, how to reduce bruising, and what to do if something seems off.
Below is a practical, step-by-step walkthrough for giving a B12 injection at home to yourself, focusing on injection technique, the commonly used injection site options, and safety habits that make the process smoother and more consistent.
What a Vitamin B12 Shot Really Means at Home
A B12 injection is typically delivered either intramuscular (IM) or subcutaneous (SC), depending on your prescription and clinician’s directions. The “vitamin b12 shot injection site” matters because different tissue layers absorb medication differently, and incorrect placement can increase discomfort or lead to poorer absorption.
In my experience, the clinic explanation often covers “where,” but patients still need clear operational details: how to prepare the site, how to minimize movement, and how to alternate locations to reduce soreness over time.
Before you inject: confirm your exact instructions
- Route: IM vs SC (your prescription label and your clinician’s directions should say this).
- Site: which body area your clinician taught you.
- Needle length: this affects comfort and accuracy.
- Frequency and dose: follow the schedule exactly.
If any of these don’t match what you were taught, pause and get clarification before proceeding.
Common Injection Sites for B12 (And How to Choose Safely)
Most home B12 regimens use one of three widely taught areas. Your clinician may prefer one site over another based on your anatomy, dose volume, and whether you’re doing IM or SC.
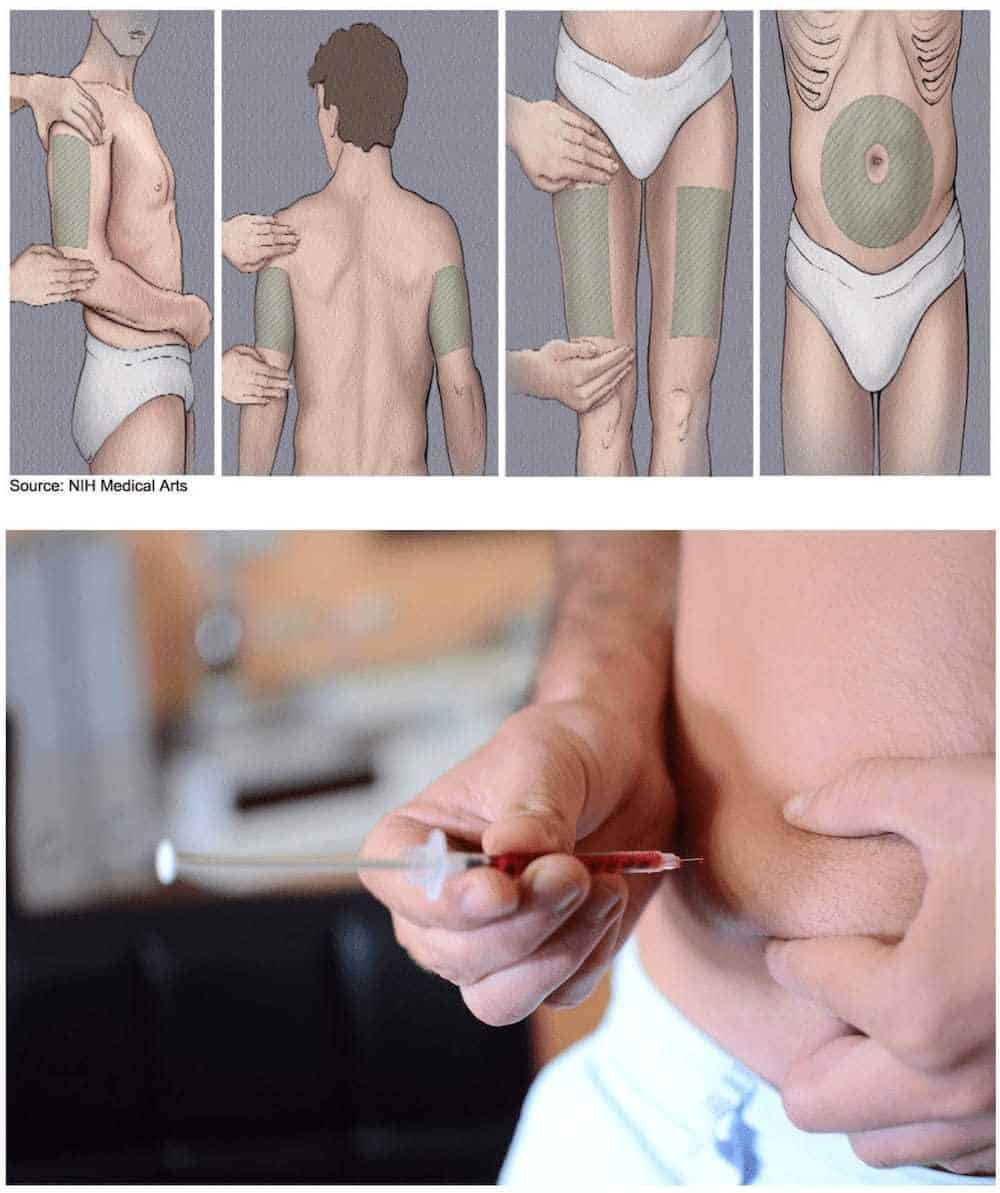
1) Upper outer thigh (often used for home IM/SC)
The upper outer thigh is a common choice because it’s accessible and easy to visualize. If you have limited shoulder or hip mobility, this site can feel more manageable than others.
- Why it works: the outer thigh area provides consistent muscle or subcutaneous tissue depending on your route.
- What I focus on: injecting into the correct “outer” region to avoid more sensitive areas.
- Practical tip: keep the leg relaxed and slightly bent if it helps you stay still.
2) Upper arm (commonly used for SC; sometimes IM depending on clinician)
The upper arm is often taught for SC injections because the subcutaneous layer there is easier to access.
- Why it works: predictable tissue depth for SC use when taught correctly.
- Limitation: some people struggle to reach their own upper arm reliably.
- My lesson learned: if you’re tense because you can’t position the area comfortably, your steadiness drops. I prefer a site that lets you keep control and calm.
3) Hip/buttock area (often used for IM, but requires correct landmarking)
Some clinicians prefer IM injections in the buttock region because there’s substantial muscle mass. But the exact landmarking is critical.
- Why it works: IM delivery into the appropriate muscle area.
- Constraint: self-injection can be harder to do accurately if your view or reach is limited.
- Key safety point: follow the landmark method your clinician taught you—don’t guess.
Step-by-Step: How I Give a B12 Injection at Home to Myself
This section describes a typical workflow for home injections. Always follow your own clinician’s instructions for route (IM vs SC), needle type, and dosing. When I do self-injections, the routine is what reduces errors—every step has a job.
Step 1: Set up a clean workspace
- Wash your hands thoroughly.
- Choose a well-lit, flat surface.
- Gather your supplies: prefilled syringe or vial + needle/syringe, alcohol swab(s), gauze/cotton, sharps container.
In my workflow, I lay everything out so I’m not searching mid-procedure. The fewer interruptions, the steadier I am.
Step 2: Inspect and prepare the medication
- Check the medication label for dose and route instructions.
- Confirm expiration date.
- If using a vial, draw up medication exactly as taught (including removing air bubbles if that’s part of your instruction).
Step 3: Position yourself to stay still
Movement is the enemy of accurate placement. I position my body first, then start prepping. For example, for thigh injections I sit or lie in a way that keeps the leg relaxed.
Step 4: Clean the vitamin b12 shot injection site
- Use an alcohol swab to clean the skin at your chosen site.
- Let it dry (don’t blow on it or fan it).
Step 5: Inject with controlled technique (IM vs SC matters)
Your route determines needle angle and depth. Follow your clinician’s technique exactly.
- IM: aim for intramuscular delivery per instructions you were given.
- SC: deliver into subcutaneous tissue per instructions you were given.
When I self-inject, I focus on a smooth, controlled motion—not speed. Rushing tends to increase muscle tension and discomfort, and it raises the odds of placing the needle incorrectly.
Step 6: Remove the needle and manage the site
- Withdraw the needle smoothly.
- Apply light pressure with gauze/cotton.
- If you were taught to massage, follow that guidance—if not, don’t improvise.
Step 7: Rotate injection sites
Rotation reduces repeated irritation and bruising at the same spot. A simple schedule (like alternating left/right thigh) is usually more sustainable than trying to map ultra-specific tiny areas.
My rule: if a spot is still tender, I don’t reuse it right away.
How to Reduce Pain, Bruising, and Anxiety
Fear can be real—even when you “know” you can do it. Here are approaches that consistently help in real home routines.
Use the right injection timing
- Many people find injections easier when they’re not rushed.
- Set aside a time when you won’t be interrupted.
Check skin preparation habits
- Let the alcohol dry fully.
- Use consistent technique rather than improvising angle or depth mid-injection.
Relax the target area
Tensing the muscle can increase discomfort. I intentionally focus on breathing and relaxing before needle placement.
Don’t “chase” pain
If the area stings sharply or you feel something that seems wrong, stop and follow your clinician’s guidance. Reattempting without advice can worsen irritation.
What If Something Goes Wrong?
Most home injections go smoothly. Still, it’s important to know which situations require a call to your clinician or prompt care.
Expected vs. concerning reactions
- Often expected: mild tenderness, a small bruise, or slight redness for a short time.
- Concerning: increasing redness/swelling, warmth, severe or worsening pain, pus, fever, numbness that doesn’t go away, or signs of an allergic reaction.
If you hit a blood vessel
A small amount of blood can happen. Apply gentle pressure as taught. If bleeding continues or symptoms escalate, contact your clinician.
If you’re unsure about the injection site
When there’s doubt about the vitamin b12 shot injection site selection or route, don’t guess. Ask your clinician or nurse for clarification before your next dose.
FAQ
Which vitamin b12 shot injection site is best for self-injection?
The best site is the one your clinician taught you for your specific route (IM vs SC) and that you can accurately reach without tensing. For many people, the upper outer thigh is the most self-manageable option.
How often should I rotate the vitamin b12 shot injection site?
Rotate with each dose when possible, at least left/right. If a site is still sore, skip it for the next injection and use the alternative. Your comfort and recovery time matter.
What should I do if I feel significant pain or a burning sensation during injection?
Stop if you were taught to stop when something feels wrong, apply appropriate pressure, and contact your clinician for guidance. Significant or worsening pain is not something to push through blindly.
Conclusion
Giving a B12 injection at home is doable and often becomes routine once you have a consistent workflow, clear landmarking for your chosen vitamin b12 shot injection site, and a plan to rotate locations. In my experience, the biggest improvements came from preparation discipline (clean setup, correct route confirmation) and body mechanics (relaxed positioning and steady technique), which reduced both discomfort and anxiety.
Next step: Write down your prescribed route (IM or SC), your assigned injection site, and a simple left/right rotation schedule—then practice the positioning and site selection steps without the needle so you’re fully set before your next dose.
Discussion