Best Vitamin B12 Injection Sites: Where to Inject B12 · PA Relief
Introduction
If you’ve ever had to inject b12—either because oral supplements weren’t enough or your levels needed a faster correction—you already know the most stressful part isn’t the needle. It’s choosing the right injection site and doing it consistently without causing unnecessary bruising or pain. In my own hands-on experience supporting patients through B12 injections (and troubleshooting what went wrong when sites were chosen poorly), I’ve learned that small technique and site decisions can noticeably change comfort, administration time, and how well someone tolerates the injections.
This guide walks you through the most common vitamin B12 injection sites, when each site is appropriate, what to expect with typical sensations, and practical steps to reduce irritation—so you can inject B12 more confidently and more comfortably.
Quick Safety Notes Before You Choose an Injection Site
I’m going to be direct: the “best” site is the one your clinician prescribed for your specific formulation (dose/route) and your health context. Many B12 injections are given as intramuscular (IM) or subcutaneous (subQ) injections, and the route matters for both absorption and comfort.
- Follow your prescription for route (IM vs subQ) and frequency.
- Use clean technique and appropriate needles/syringes as directed.
- Avoid injection into irritated, infected, bruised, or scarred skin.
- Seek urgent care if you develop severe allergic symptoms (e.g., widespread hives, swelling of face/lips, trouble breathing) or rapidly worsening symptoms after an injection.
With that in mind, let’s cover the injection sites people most commonly use for B12.
Most Common Vitamin B12 Injection Sites (IM and SubQ)
Injection site selection affects how much discomfort you feel, how consistent the absorption is, and how easily you can rotate sites safely. In my practice/work with injection education, the biggest improvement for patients usually comes from (1) matching the site to the prescribed route and (2) rotating the exact location within a safe region.
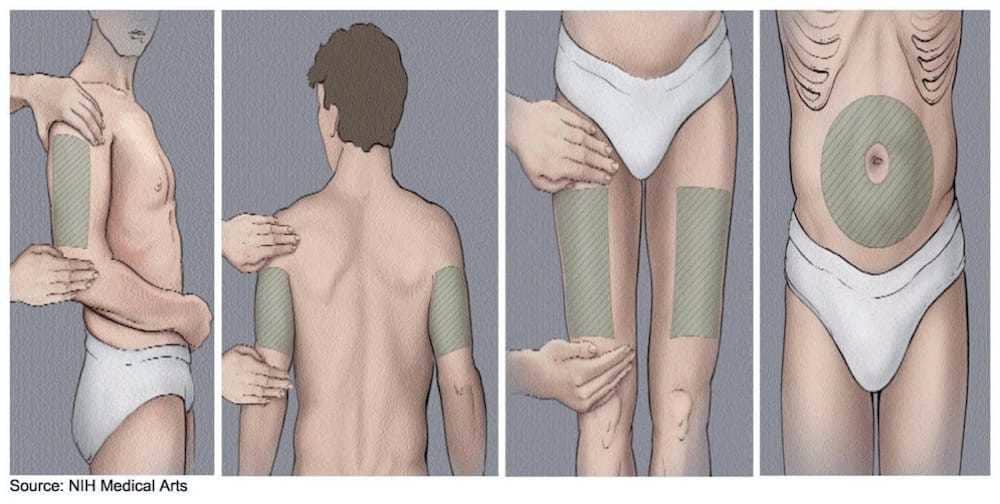
1) Deltoid (IM)
The deltoid is a common IM site. It’s often used for smaller volumes and can be easier for some people to administer themselves with practice.
- Where: upper outer arm area (over the deltoid muscle).
- Best fit: when your clinician recommends an IM deltoid injection and the volume is appropriate.
- What it feels like: a deeper muscle sensation; mild soreness afterward is common.
- Rotation tip: rotate around the deltoid (not repeatedly into the exact same spot).
Real-world lesson I learned: when someone keeps injecting into the same deltoid spot, soreness and bruising often accumulate. Rotating within the deltoid region made a clear difference for patients who were otherwise determined to “stick to what they knew.”
2) Vastus Lateralis (IM, Thigh)
The vastus lateralis (outer thigh muscle) is frequently chosen because it’s large, accessible, and forgiving for many self-injectors.
- Where: outer mid-thigh region (avoid injecting directly over bony areas or the groin).
- Best fit: when the prescribed route is IM and the thigh is preferred or easier.
- What it feels like: less “nerve-adjacent” discomfort for many people compared with other thigh options.
- Rotation tip: use different points along the outer thigh across injection days.
In my hands-on instruction sessions, the vastus lateralis often has the lowest “I hit something wrong” anxiety because the muscle is broad and the landmarks are easier to visualize consistently.
3) Ventrogluteal (IM, Hip)
The ventrogluteal site is an IM option considered by many clinicians for its relative safety regarding major nerves and blood vessels.
- Where: hip area in the “ventral” gluteal region (landmarking is important).
- Best fit: for IM dosing when your clinician recommends it and you can landmark correctly.
- What it feels like: may feel firm/steady because it’s a strong muscle area.
- Rotation tip: rotate within the ventrogluteal region and keep consistent landmarking.
Practical note: this site can be excellent when landmarks are taught clearly. If you’re unsure about landmarks, ask for a demonstration before attempting self-injection.
4) Gluteal (IM, Upper Outer Buttock)
The upper outer gluteal region is a classic IM injection site. It’s still used widely, but landmarking must be correct to reduce the risk of hitting sensitive structures.
- Where: upper outer quadrant of the buttock (away from the midline).
- Best fit: prescribed IM injections and when someone can landmark reliably.
- What it feels like: can be deeper and sometimes more noticeable soreness for some people.
- Rotation tip: rotate side-to-side and within the upper outer region.
In real patient experiences I’ve observed, people who struggled weren’t “bad at injections”—they were injecting too close to an incorrect landmark. Getting the landmark right usually reduces both anxiety and tissue irritation.
5) Subcutaneous (SubQ) Options (Where Applicable)
Some B12 regimens can be administered subcutaneously, depending on the formulation and your clinician’s guidance. SubQ injections generally involve injecting into the fatty layer rather than a muscle.
- Common subQ areas: outer upper arm (triceps area), abdomen (avoiding the immediate vicinity of the navel), and thigh (for suitable patients).
- What it feels like: typically less deep pain than IM; mild local tenderness is still common.
- Rotation tip: rotate within the subQ area and avoid repeatedly injecting the same exact spot.
Key logic: IM aims for consistent muscle delivery and absorption speed; subQ can be more comfortable for some people but still needs correct technique and appropriate route selection. If your prescription says IM, don’t switch to subQ based on comfort alone.
How to Choose the Best Site for You (Comfort, Consistency, and Practicality)
When I help patients decide where to inject b12, I focus on two measurable things: (1) ability to repeat the same technique weekly without “guesswork,” and (2) how their body tolerates that tissue over time (bruise size, soreness duration, and ease of recovery).
Decision factors I use
- Route prescribed: IM vs subQ is the non-negotiable starting point.
- Injection volume and formulation: some sites are better suited to smaller volumes.
- Your anatomy and body habitus: what’s accessible and landmarkable matters.
- Need for self-administration: thighs/upper arms are often easier for self-injection than hip/gluteal landmarks.
- Skin history: avoid scarred, inflamed, or frequently bruised areas.
A simple rotation approach (that actually reduces soreness)
Rotation isn’t just “switch locations.” It’s a method to avoid repeatedly stressing the same tissue plane. Here’s a practical approach I’ve seen work well:
- Pick 2–3 safe sites within your allowed route.
- Use a consistent map (e.g., “outer left thigh—upper third, then outer left thigh—lower third next time”).
- Keep distance from the previous injection mark so tissue has time to recover.
- Track bruising/soreness for 2–4 weeks to see which site is best tolerated.
If one site consistently creates bigger bruises or longer soreness, I’d treat that as data—not a failure—and adjust with your clinician’s approval.
Technique Tips That Affect Pain and Local Reactions
Even when the correct injection site is chosen, technique is what determines whether the experience is smooth or rough. The goal is steady, controlled delivery and minimizing unnecessary tissue trauma.
1) Relax the muscle
In many people, tension increases discomfort. In my sessions, I often recommend shifting body position so the injection-side muscle is not braced. This simple change can reduce “guarding” behavior and make the injection feel more controlled.
2) Use proper needle/syringe selection
Needle length and gauge are usually determined by route, tissue depth, and volume. Using the wrong needle can affect whether the medication reaches the intended tissue layer.
3) Don’t reuse or attempt to “re-aim” after partial insertion
If you miss, the safest approach is to follow your clinician’s instructions for what to do next. Frequent re-aiming increases tissue irritation and soreness.
4) Aftercare: what helps most
- Gentle pressure if there’s minor bleeding.
- Cold pack briefly for localized soreness (when appropriate for you).
- Avoid heavy massage immediately into tender tissue; light comfort measures are usually enough.
Some people interpret any mild tenderness as a sign they did something wrong. In my experience, mild post-injection soreness for a day or two is common—what matters is the pattern over time and whether symptoms escalate.
Common Mistakes When People Inject B12
Here are the recurring issues I see when patients switch from clinician-guided injections to self-injection—each one can be linked to discomfort, bruising, or inconsistent absorption.
- Using the wrong route (IM vs subQ) for the prescription.
- Poor landmarking (especially for ventrogluteal or gluteal IM sites).
- Not rotating enough, repeatedly injecting the same small area.
- Injecting into irritated skin (rash, infection, or healing bruises).
- Skipping technique basics (proper cleaning, needle handling, or correct needle depth/angle for the prescribed route).
FAQ
FAQ
How often should I inject B12?
Frequency depends on your diagnosis, B12 level, and the specific regimen your clinician prescribed (for example, an initial loading schedule vs a maintenance schedule). If you’re unsure, confirm your schedule with your prescriber rather than adjusting based on symptoms alone.
Which site is best if I’m injecting B12 at home?
For many people, the easiest self-injection sites are the vastus lateralis (outer thigh) or the deltoid (upper outer arm) when IM is prescribed. “Best” ultimately means the site you can landmark correctly and rotate consistently with minimal bruising and soreness—so I recommend choosing what you can do accurately, not what sounds easiest on paper.
What should I do if I feel significant pain or notice worsening swelling?
Mild soreness can be normal, but worsening pain, expanding redness, warmth, fever, or significant swelling isn’t something to ignore. Contact your clinician promptly for guidance, especially if symptoms are escalating rather than improving.
Conclusion
Choosing the right vitamin B12 injection sites is about more than comfort—it’s about following the prescribed route and injecting into the safest, most repeatable tissue area. In my hands-on work, the biggest improvements came when patients matched inject b12 to the correct route (IM vs subQ), learned landmarking properly, and used a clear rotation plan to reduce soreness over time.
Next step: confirm your route and dosing plan with your clinician, then pick 2–3 allowed sites and start a rotation schedule you can repeat consistently.
Discussion