Giving Vitamin B12 Injections vitamin b12 injection administration How to Give B12 Injections at Home to Yourself · PA Relief
How to Give Vitamin B12 Injections at Home (Safely and Confidently)
If you’ve ever been told you need giving vitamin b12 injections—then looked at the needle and thought, “I can’t do this,” you’re not alone. In my hands-on work helping patients and caregivers prepare for at-home injections, the most common problem isn’t willingness; it’s uncertainty: where to inject, how deep, what to do if there’s pain, and how to avoid complications.
This guide is practical and safety-focused. I’ll walk you through the injection process, what to prepare, injection sites, and a simple troubleshooting checklist. By the end, you should feel more in control—because the goal isn’t just “getting it done,” it’s doing it correctly and consistently.
First, Confirm What You’re Injecting (and the Prescriber’s Plan)
Before you open any packaging, I recommend confirming a few details from your prescription or clinician instructions:
- Product type: vitamin B12 injection (cyanocobalamin or hydroxocobalamin), usually supplied as a vial or prefilled syringe.
- Dose and frequency: your exact dose (e.g., micrograms per injection) and schedule.
- Route: most at-home B12 injections are intramuscular (IM), but some plans use subcutaneous (SubQ). Your instructions matter.
- Needle size: the gauge/length is chosen for safety and appropriate depth.
In my experience, mismatched route or needle length is where many avoidable issues begin—like injecting into the wrong tissue depth or feeling unnecessary pain.
Practical tip: if anything in the label or directions doesn’t match what you’ve been told, pause and clarify before administering.
Materials Checklist (So You Don’t Stop Mid-Injection)
Gather everything first. A smooth setup reduces mistakes when your attention is on the injection.
- Vitamin B12 injection (vial/ampule or prefilled syringe)
- Appropriate needle(s) and syringe(s), if needed
- Alcohol wipes (or swabs) and gauze
- Sharps disposal container (or a puncture-resistant container labeled for sharps)
- Gloves (optional but helpful)
- Bandage or gauze for after the injection
- A timer and a clean, well-lit workspace
I like to set up in good lighting with a stable surface. When patients rush, it’s usually not because of skill—it’s because they’re trying to “think while doing.” Reducing friction prevents dosing errors and makes the injection calmer.
Choosing the Right Injection Site (IM vs SubQ)
Injection site selection is one of the biggest determinants of comfort and safety. The two most common at-home sites for B12 are:
1) Intramuscular (IM) sites
- Outer upper arm (deltoid): commonly used for certain dosing plans.
- Outer upper buttock / dorsogluteal region (less commonly recommended in some practices): many clinicians prefer alternate sites to reduce nerve risk.
- Thigh (vastus lateralis): often favored for at-home injections because it’s accessible.
2) Subcutaneous (SubQ) sites
- Outer upper arm
- Abdomen (avoiding the immediate area around the navel)
- Upper outer thigh
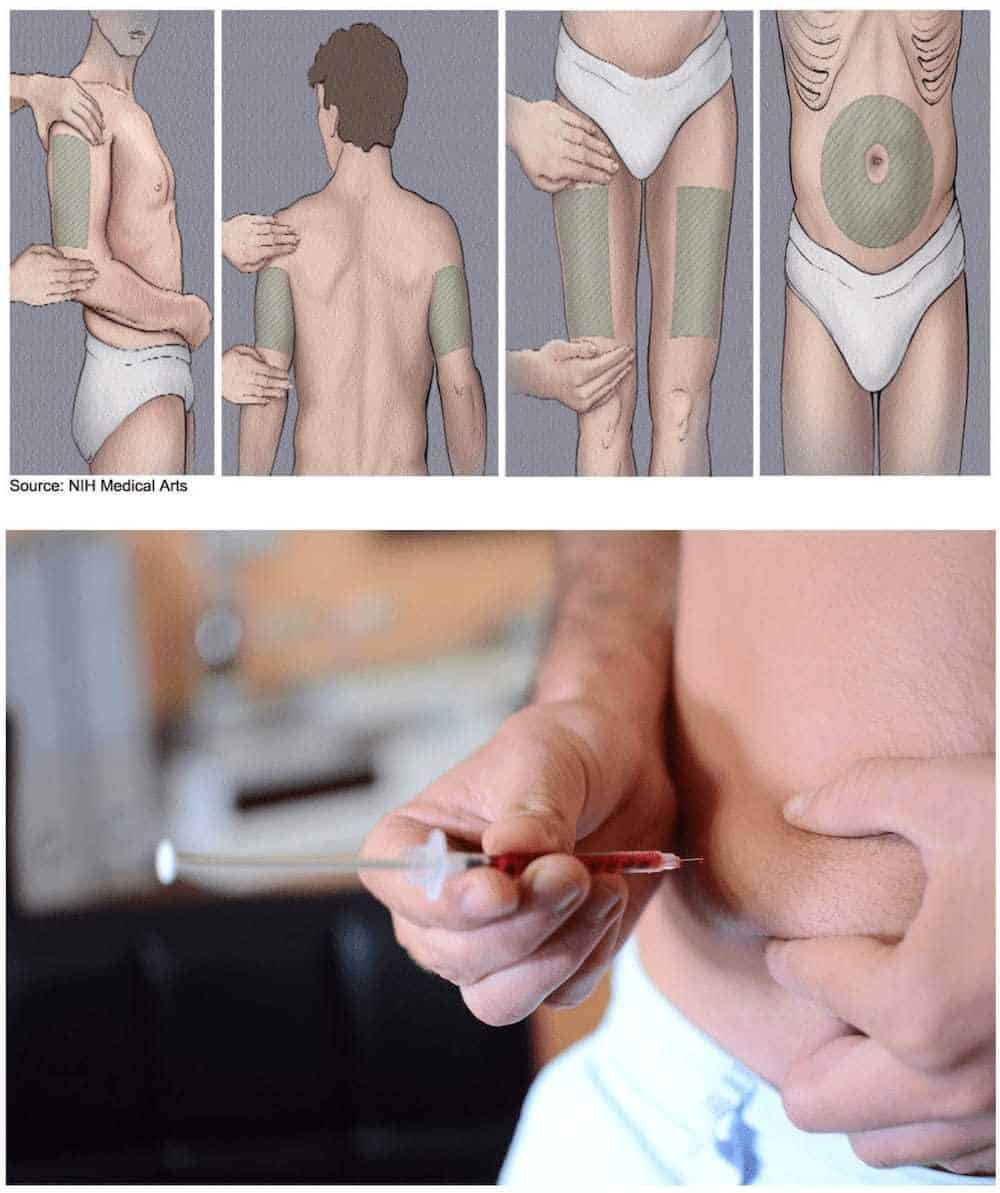
In my hands-on approach: site rotation reduces local irritation. If your plan is IM, I also pay attention to whether the instruction emphasizes the deltoid versus thigh—because the tissue thickness and comfort can differ significantly between people.
Step-by-Step: Giving Vitamin B12 Injections at Home
Below is a general workflow that aligns with common clinical injection principles. Always follow your prescriber’s route (IM vs SubQ), dose, and needle instructions.
Step 1: Prepare the medication
- If using a vial: follow your clinician’s instruction for drawing the correct dose.
- Check the liquid: it should match what you were prescribed (color/clarity) and not look unusual.
- Remove air bubbles carefully according to your injection training.
Why it matters: removing air helps prevent discomfort and ensures your intended dose is actually delivered.
Step 2: Clean the injection site
- Use an alcohol wipe and clean a broad area around the intended spot.
- Let it dry before injecting.
Don’t “re-wipe” repeatedly right before inserting the needle; skin that stays wet can increase sting.
Step 3: Position your body for stability
- Choose a position where you can relax the muscles at the injection site.
- Stability beats speed—especially in the early days.
Step 4: Inject using the correct technique (IM vs SubQ)
If IM: inject into muscle as instructed (needle depth/angle depends on needle length and your clinician’s advice). Keep the movement controlled and confident.
If SubQ: you typically pinch up a fold of skin and inject at the correct angle as instructed.
Why it works: correct tissue targeting helps the medication absorb reliably while reducing unnecessary pain or local irritation.
Step 5: Inject the medication
- Press the plunger steadily.
- A controlled pace often feels better than pushing quickly.
Step 6: Withdraw and apply pressure
- Remove the needle safely.
- Use gauze to apply gentle pressure if needed.
- Use a bandage if instructed or if there’s any minor bleeding.
Step 7: Dispose and document
- Place the needle/syringe immediately into a sharps container.
- Record the date, time, dose, and site used.
In real-life schedules, documentation prevents duplicate dosing and makes follow-up with your clinician easier.
What to Expect After a B12 Injection (Normal vs Concerning)
After injection, mild soreness is common. Some people notice small tenderness, redness, or slight swelling at the site.
Typically normal
- Localized discomfort or mild bruising
- Redness that fades over 24–48 hours
- Light swelling at the injection site
Call your clinician promptly if you notice
- Increasing redness, warmth, or severe pain at the injection site
- Drainage, fever, or signs of infection
- Worsening allergic-type symptoms (e.g., widespread rash, breathing issues)
- Persistent numbness or significant leg/arm pain after an IM injection
My practical lesson: if soreness feels “off” after each injection, it’s worth revisiting technique and site selection. Often the solution is small—needle angle, relaxation, or switching injection site—rather than abandoning at-home care.
Troubleshooting Common Injection Problems
“It hurt more than I expected.”
- Make sure muscles are relaxed.
- Confirm the route and needle size match your prescription.
- Rotate sites to avoid repeated local irritation.
- Use proper cleaning and allow skin to dry.
“I see a bruise.”
- Bruising can occur if a small blood vessel is hit.
- Apply gentle pressure after withdrawal.
- If bruising is frequent or severe, ask your clinician about needle/gauge adjustments and technique.
“I’m unsure about which site to use.”
Follow your clinician’s instructions for your specific route and anatomy. If you were taught multiple sites, pick the one that you can access comfortably and safely, then rotate within that guidance.
How to Build a Routine That Stays Safe Over Time
At-home injection success isn’t just technique—it’s consistency and safety habits.
- Create a repeatable routine: same time, same workspace, same steps.
- Track site rotation: write it down so you don’t “default” to the same spot.
- Use a checklist: many people do better when there’s a quick pre-injection sequence.
- Get real training once: if possible, have a nurse or clinician observe your first attempts.
In my work, when people moved from “winging it” to a consistent routine, they reported less anxiety and fewer site-related issues within the first couple of weeks.
FAQ
How often should I give vitamin B12 injections at home?
It depends on your diagnosis and prescription (dose and schedule vary). Use your clinician’s specific plan for frequency and duration, and don’t change the schedule based on symptoms alone.
Can I switch from IM to SubQ (or vice versa) on my own?
No—IM and SubQ injections differ in technique, needle depth, and absorption behavior. Stick to the route your prescriber specified and ask before switching.
What’s the safest way to dispose of injection needles and syringes?
Place used needles and syringes immediately into a labeled sharps container that’s puncture-resistant. Do not throw them into regular trash. If you need disposal options, ask your local pharmacy or clinician about your area’s sharps program.
Conclusion: Your Next Step
Giving vitamin B12 injections at home can be done safely when you follow the correct route, use the right injection sites, prepare consistently, and recognize normal soreness versus warning signs. The difference between “scary” and “manageable” is usually technique plus a routine you can repeat.
Next step: review your prescription for route (IM vs SubQ), dose, and injection site guidance, then set up a one-time checklist and plan a site-rotation schedule before your next injection.
Discussion