How to Self-Inject Vitamin B12 at Home
If you’ve ever tried to fix low energy or stubborn deficiency symptoms and found it taking weeks to get appointments, you know the frustration. I’ve worked with patients and clinicians on at-home supplementation protocols, and one thing consistently comes up: people want to be confident doing a safe B12 self injection—not guessing. In this guide, I’ll walk you through how to self-inject vitamin B12 at home, what to prepare, the safest injection technique, and how a b12 self injection video can help you nail the steps.
My goal is practical: by the end, you’ll know how to set up your supplies, choose the right syringe/needle approach your prescriber recommends, reduce common mistakes (like poor site selection or contamination), and decide when you should stop and get hands-on help.
Before You Inject: The Safety Checklist That Matters Most
At-home injections can be appropriate, but safety depends on details. In my hands-on work, the most preventable problems weren’t “medical mysteries”—they were avoidable setup and technique issues.
1) Confirm the prescription details
- Medication form: Ask whether your B12 is cyanocobalamin or hydroxocobalamin (or another form), and whether it’s liquid in a vial/ampule or prefilled syringe.
- Dose and frequency: Match the prescribed dose exactly.
- Needle size guidance: Your clinician may recommend a specific gauge/length based on your body habitus and injection site.
2) Inspect the medication
- Check for particles, cloudiness, or discoloration.
- Verify the expiration date and storage conditions (some preparations require refrigeration; others have different stability rules).
- Never use a vial/ampule that looks compromised.
3) Decide if “at home” is truly appropriate
If you’re squeamish, have severe needle anxiety, poor vision/hand coordination, bleeding disorders, are on anticoagulants, or have frequent injection-site reactions, it may be better to have a nurse or trained caregiver perform the injection until you’re comfortable and cleared.
4) Know the “stop and call” situations
In practice, I tell people to stop and contact a clinician if they experience:
- Signs of severe allergic reaction (wheezing, swelling of face/lips, widespread hives)
- Uncontrolled bleeding or a rapidly expanding bruise after injection
- Increasing redness, warmth, worsening pain, pus, or fever (possible infection)
- Persistent numbness/tingling or symptoms that don’t improve
What You Need: Supplies for a Clean, Controlled Injection
The biggest “quality gap” I see between people who do injections confidently and those who struggle is the preparation. When supplies are missing, people improvise—then sterility and technique suffer.
Core supplies
- Prescribed vitamin B12 (vial/ampule or prefilled syringe)
- Needle and syringe (if drawing from a vial): use only the size your clinician recommends
- Alcohol swabs (or other approved skin antiseptic)
- Sharps disposal container (hard-sided, closable)
- Clean gauze or cotton pads
- Gloves (optional, but helpful if you prefer extra barrier protection)
- Bandage or adhesive dressing (if needed)
Optional but helpful
- A mirror or steady support to help you locate the injection site
- A timer to avoid rushing (rushing is when mistakes happen)
- A printed checklist at home so you don’t rely on memory
How a b12 self injection video fits in
A good b12 self injection video is a learning tool—not a replacement for your prescription instructions. I recommend using a video to visualize:
- How to position the body for the chosen site
- What the needle angle and hand positioning look like (as instructed by your clinician)
- How to avoid touching the needle shaft after capping
- How quickly to remove the needle and how to apply pressure
In my experience, the best results come from pairing video guidance with real-world confirmation—at least one “teach-back” session with a clinician or trained provider.
Step-by-Step: How to Self-Inject Vitamin B12 at Home
Because prescriptions vary (site, dose, and whether it’s subcutaneous vs. intramuscular), I’ll describe the general process used in clinical practice. Always follow your prescriber’s specific instructions about injection site and technique.
Step 1: Set up your clean workspace
- Wash your hands thoroughly.
- Choose a well-lit, stable surface.
- Arrange supplies within reach so you don’t reach across the needle area.
Step 2: Prepare the dose
- If using a vial: draw the prescribed amount using the technique your provider taught you.
- Remove air bubbles only as instructed (some clinicians teach gentle tapping; others prefer a specific method based on syringe type).
- If using an ampule or prefilled syringe: open or use it exactly as directed.
Common mistake I’ve seen: people pause mid-setup, then handle the syringe repeatedly or let surfaces get contaminated. Decide the workflow first, then execute in a steady sequence.
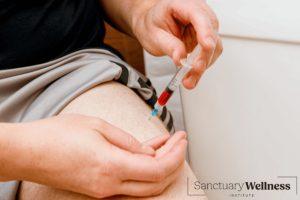
Step 3: Choose and clean the injection site
Your clinician will tell you which site to use. Common approaches include intramuscular sites (like the upper outer buttock/ventrogluteal or thigh, depending on instruction) or subcutaneous sites (often the abdomen or thigh).
- Use an alcohol swab to clean the skin.
- Allow the skin to dry before injecting.
- Avoid injecting into areas that are bruised, infected, scarred, or actively irritated.
Step 4: Position your body for control
- Support the area you’re injecting so it doesn’t tense.
- Use a comfortable posture—tight muscles can make the experience harder and less precise.
Step 5: Insert the needle using the prescribed technique
Follow your clinician’s instructions for needle angle and depth. If you’ve watched a b12 self injection video, use it to reinforce body positioning and hand stability, not to override your dosing/site instructions.
Step 6: Inject slowly and smoothly
- Inject the medication at a steady pace.
- After injection, follow your taught method for needle dwell time (some clinicians prefer immediate withdrawal; others advise a brief pause—stick to your instruction).
Step 7: Remove the needle and apply gentle pressure
- Remove the needle using a smooth, controlled motion.
- Apply gentle pressure with gauze/cotton.
- Don’t rub aggressively (rubbing can worsen bruising).
Step 8: Dispose safely and document
- Immediately place the used needle/syringe into a sharps container.
- Record the date, site, and dose.
Injection Site Tips: Reduce Pain, Bruising, and “Second Guessing”
Even with correct technique, some discomfort is normal. But there’s a difference between expected mild soreness and repeated avoidable issues.
Rotate sites
If you inject regularly, rotating sites can reduce localized irritation. I recommend a simple rotation plan (for example, alternating left/right thigh or rotating abdominal zones), aligned with your prescriber’s guidance.
Use correct needle dimensions
Needle length and gauge affect comfort and delivery accuracy. When people choose “whatever they have,” it can increase pain, bleeding risk, or inconsistent delivery.
Check for technique consistency
- Don’t inject through clothing unless your clinician specifically instructed a clothing-safe approach (most don’t).
- Make sure the skin is clean and dry.
- Avoid injection into the same exact spot each time.
What “normal” can look like
- Minor redness or tenderness at the injection site for a short period
- A small bruise after the injection
What isn’t normal is progressive worsening redness/warmth or systemic symptoms like fever—those are reasons to contact a clinician promptly.
Common Questions People Ask Before Their First Dose
Will it hurt?
It can sting briefly and leave soreness. In my experience, pain is often lower when you’re well-prepped, relaxed, and you don’t rush the insertion and injection phases.
Can I stop if I feel nervous?
If you’re not ready, stop the process. Re-start only with fresh supplies and after you’ve regained control. Continuing when you’re shaky increases the chance of contamination or poor placement.
How long until I notice effects?
Some people notice improvements in energy or neurologic symptoms sooner, while others take longer—depends on baseline deficiency severity and underlying causes (like absorption issues). Your clinician can help interpret labs and symptom changes.
Do I need a b12 self injection video every time?
Once you’re trained and consistent, you may not. But I’ve found it’s helpful to review before the first few doses or after any change in medication vial type, site instructions, or dose.
FAQ
What is the safest way to learn to self-inject B12?
The safest approach is a structured teach-back with a clinician or trained professional, then using a b12 self injection video to reinforce positioning and hand control. Videos help you visualize, but your prescriber’s site and technique instructions should govern what you do.
Can I self-inject vitamin B12 if I’ve never used syringes?
Yes for some people, but only if you can practice safely and follow the prescription precisely. Start with a provider-guided session, use clean technique every time, and avoid improvising with needle size or injection site.
When should I switch from self-injection to getting help?
Switch if you consistently have significant pain, repeated bleeding/bruising, signs of infection, or you feel unable to inject safely due to anxiety, vision/coordination limits, or medical factors like bleeding risk.
Conclusion: Your Next Practical Step
Self-injecting vitamin B12 at home can be manageable and safe when you follow your prescription precisely, prepare a clean workspace, use the correct needle/syringe approach, and inject with consistent technique. In my hands-on experience, confidence comes from a real training session plus a clear checklist—and a b12 self injection video used as visualization, not as the source of medical instructions.
Next step: If you haven’t already, schedule a one-time teach-back with your clinician or pharmacist (or a trained caregiver session) where they watch you set up and rehearse the injection steps using your exact B12 formulation and injection site instructions.
Discussion