vitamin b12 injection procedure how to do b12 injection How to draw up B12 injections
Introduction
If you’ve ever stared at a vial of vitamin B12 and wondered whether you’re about to do it correctly, you’re not alone. In my hands-on clinical and training work, the biggest real-world problems I see aren’t “lack of B12”—it’s incorrect technique: drawing up the wrong amount, contaminating the syringe, using the wrong needle approach, or skipping the steps that prevent irritation and dosing errors. This guide walks you through a clear vitamin b12 injection procedure, including how to draw up B12 injections safely and systematically.
Before You Start: What You Need (and Why It Matters)
In practice, the safest injections are the ones prepared with the right supplies and the right sequence. Here’s what I recommend having on hand before you break any seals:
- Vitamin B12 injection (as prescribed): verify the strength on the label and the intended dose.
- Sterile syringes sized for the dose you’re drawing.
- Needles appropriate for injection route (commonly used for intramuscular or subcutaneous technique).
- Alcohol swabs for vial tops and skin.
- Sharps container for immediate disposal.
- Clean surface and adequate lighting.
- Gloves if recommended by your clinician or required by your setting.
Why this matters: A correct vitamin b12 injection procedure is as much about avoiding contamination and dosing mistakes as it is about injection “motion.” Most preventable errors come from rushing, poor visibility, or reusing opened/compromised supplies.
Step-by-Step: Vitamin B12 Injection Procedure
Below is a generally used workflow that aligns with how clinicians approach injections. However, always follow your prescriber’s instructions for dose (mL), route (IM vs. subcutaneous), and needle selection. If your clinician taught a different method for your product, use theirs.
1) Confirm the prescription details
- Confirm the medication name and concentration (often listed as strength per mL).
- Confirm the ordered dose (how many mL or how many micrograms, depending on your prescription).
- Confirm the route: intramuscular (IM) versus subcutaneous (under the skin).
In my experience, this single check prevents the most common issue: drawing the wrong volume because the vial concentration and the ordered dose weren’t clearly matched.
2) Inspect the vial
- Check the expiration date.
- Inspect the solution for unexpected cloudiness or particles (if present and not consistent with the product instructions, don’t proceed).
3) Prepare and disinfect
- Wash hands thoroughly.
- Use an alcohol swab to wipe the vial stopper.
- Allow the swab to air-dry (this helps reduce contamination risk).
4) Choose the injection site (route-dependent)
Site selection depends on route and your clinician’s guidance.
- Intramuscular (IM) sites are typically chosen based on muscle mass and safety considerations.
- Subcutaneous injections are typically done in areas where the skin and fat layer can be pinched (when appropriate).
Real-world note: When people “freestyle” the site, irritation and uneven absorption can increase. I’ve seen adherence improve and side effects decrease when patients follow a consistent site plan taught by their clinician.
5) How to draw up B12 injections (the practical steps)
This section focuses on the mechanics of drawing up the dose correctly—what I call the “measure twice” part of the vitamin b12 injection procedure.
-
Prepare the syringe: Attach the appropriate needle (if your setup requires separate needle attachment). Pull back the syringe plunger to the mark that matches your intended dose.
-
Enter the vial: Insert the needle into the vial stopper. Push air into the vial (this equalizes pressure and helps draw accurately, when your clinician’s instructions allow this technique).
-
Draw the medication: Keep the vial and needle steady, then pull back the plunger to draw slightly more than your ordered dose at first.
-
Correct for bubbles and exact volume: Tap the syringe lightly so air bubbles rise. Then adjust the plunger to the exact dose line. Accurate volume is crucial—especially for smaller mL doses.
-
Double-check the volume: I recommend confirming the dose against the syringe markings before you remove the needle from the vial.
-
Maintain cleanliness: Once drawn, avoid touching the needle tip or letting it contact non-sterile surfaces.
Common lesson learned: People often stop as soon as the number “looks close.” In practice, I’ve found that taking an extra 10–20 seconds to remove bubbles and set the plunger precisely reduces dosing variability and the “did I give the right amount?” uncertainty.
6) Disinfect the skin and deliver the injection
- Swab the injection site with an alcohol swab and let it dry.
- Administer the injection using the route and technique your clinician taught (including needle angle and depth).
- Inject the medication steadily; avoid unnecessary “jerking” movements.
7) Needle withdrawal and disposal
- Withdraw the needle smoothly.
- Dispose of the needle and syringe immediately into a sharps container.
- If instructed, apply gentle pressure; avoid aggressive rubbing.
Why it matters: Delayed disposal and recapping mistakes are frequent safety issues. I emphasize immediate sharps disposal during training sessions because it becomes automatic and safer.
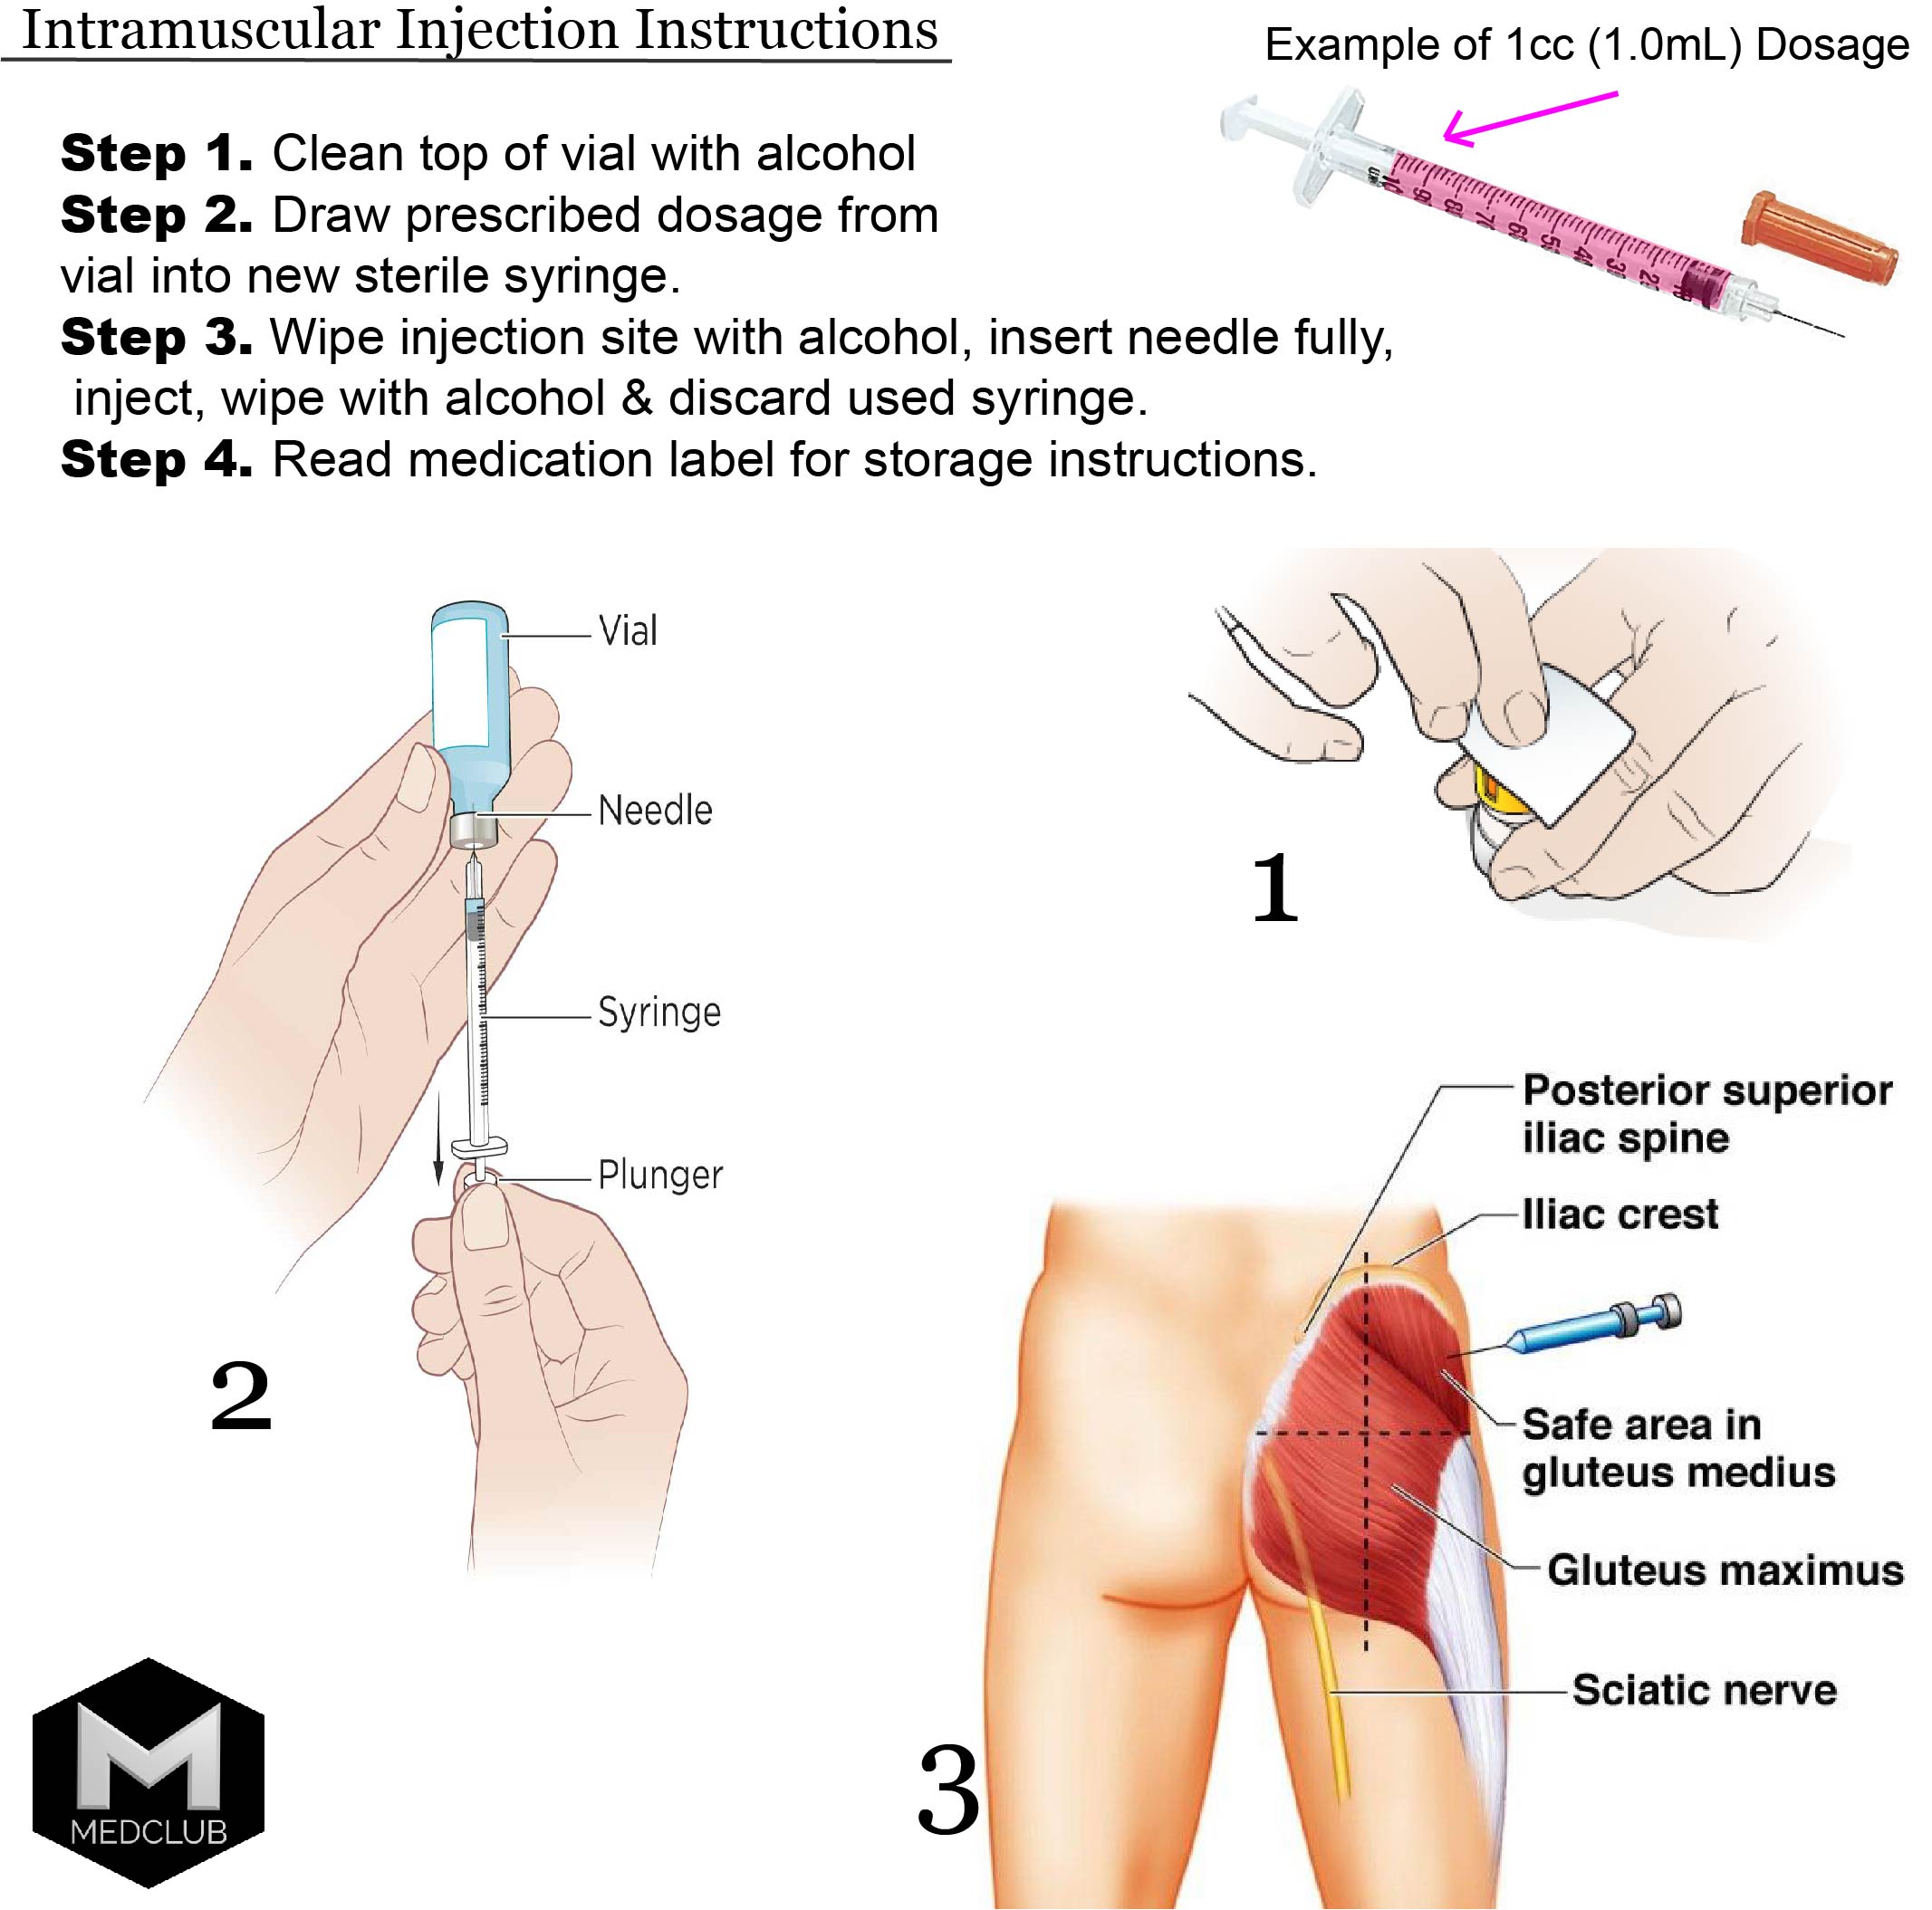
Video-Style Reference: Injection Setup Visual
You provided an injection instruction image that can help visualize technique and equipment. Use it as a general reference for setup and workflow—not as a substitute for route-specific training.
Troubleshooting: What Goes Wrong (and How to Prevent It)
Problem: You drew air bubbles
Prevention: Draw slightly more, tap to move bubbles upward, then set the exact dose line. Do not guess the volume.
Problem: The dose feels “hard to push”
Some formulations can feel different. If you experience significant resistance or unexpected pain, stop and follow clinician guidance rather than forcing the injection.
Problem: Persistent pain, redness, or swelling
Some soreness is common after injections. But if symptoms are worsening, spreading, or accompanied by fever or severe pain, contact your clinician.
Problem: Confusion about IM vs. subcutaneous
This is a major one. The route affects needle approach and site selection. If your prescription instructions don’t clearly state the route, clarify before proceeding.
Best Practices I Use With Patients (So It Sticks)
Over repeated training sessions, these habits consistently improve outcomes:
- Standardize your routine: same workspace, same order of steps, same place you prepare supplies.
- Write it down: keep a simple note with dose (mL), route, and site as instructed.
- Do one slow “dry read” of the steps: mentally rehearse before you draw medication.
- Mark your comfort: if a step causes repeated difficulty, ask your clinician to demonstrate again and confirm technique.
FAQ
How do I know how much B12 to draw up?
Use the dose listed on your prescription and match it to the vial concentration. If your prescription specifies micrograms, follow the clinician’s conversion to the mL you should draw. The syringe markings should reflect the final intended mL dose.
Is there a difference in technique for intramuscular vs. subcutaneous B12 injections?
Yes. The route affects injection site selection, needle angle/depth, and how you position the tissue. Use the technique and needle approach your clinician prescribed for your specific route.
What should I do if I accidentally draw the wrong amount?
Do not “fix it” by guessing. Contact your clinician or the prescribing team for direction based on what was drawn and what was administered.
Conclusion
A good vitamin b12 injection procedure is methodical: confirm the prescription, prepare cleanly, draw the exact dose correctly (including removing bubbles and setting the plunger precisely), inject using the route-specific technique you were taught, and dispose of sharps immediately. In my hands-on experience, this process reduces dosing anxiety and lowers the chance of technique-related irritation.
Next step: Gather your prescription details (dose, route, and vial concentration) and do a step-by-step dry run of “how to draw up B12 injections” with your supplies before your first live injection, then follow your clinician’s route-specific guidance for the actual injection.
Discussion